
Originally published August 26th, 2017.
Chatbots have become a very exciting area of development with companies like Facebook leveraging the Messenger platform as a place where developers can create bots that answer questions, book appointments, and even interact with payment apps such as Venmo to satisfy the needs of their customers. In this proof of concept, we’ll be focusing on IBM’s Watson conversation service as we create a chatbot designed to handle questions alongside customer service agents using the Salesforce Live Agent chat platform.
This project will be discussed in two separate posts- this post will begin by outlining a typical scenario that articulates the business value proposition of a chatbot and will focus on integrating Salesforce Live Agent into your Visualforce page. The second part will elaborate on how to add a chatbot built using the Watson Conversation service and how to host it on IBM’s Bluemix platform.
The Business Value Proposition of Chatbots
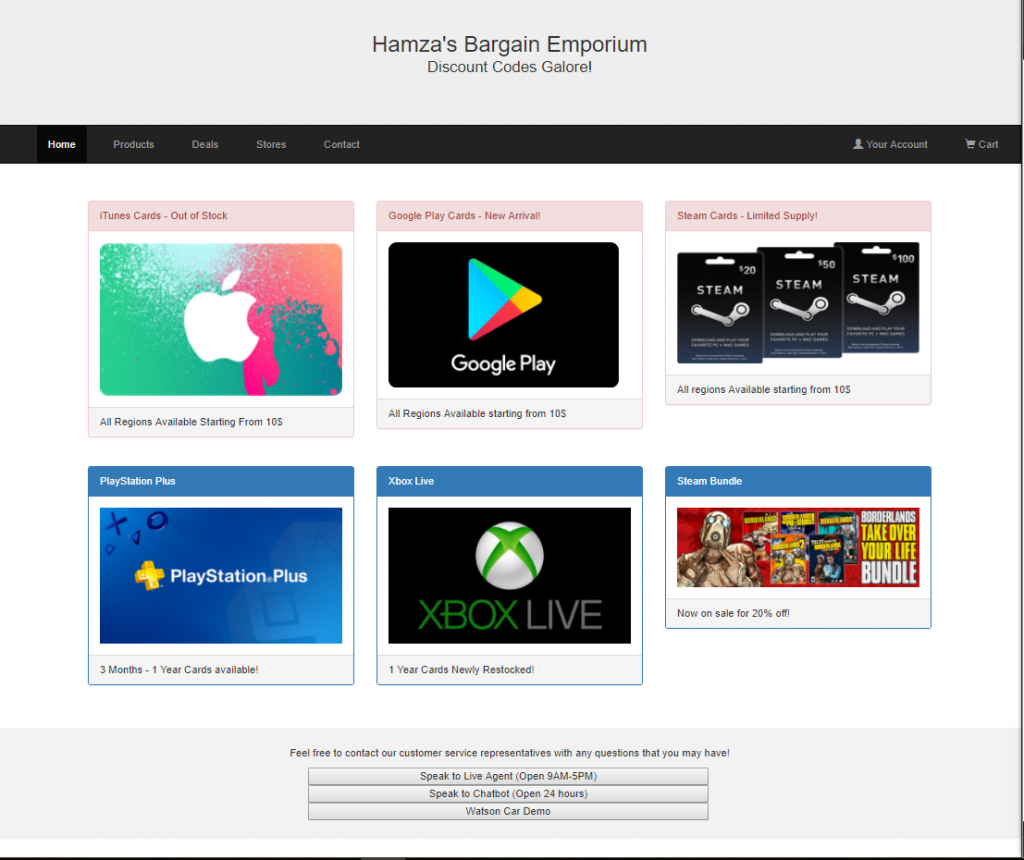
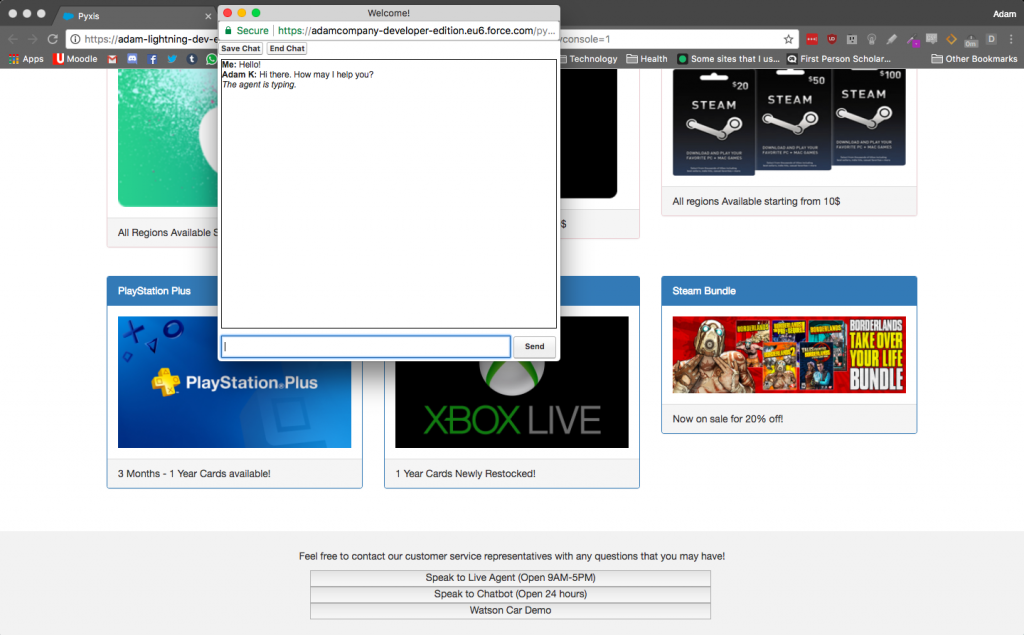
Hamza is the owner and operator of a small eCommerce business which sells digital codes for people who want to buy and redeem vouchers for online storefronts such as the App Store & Steam from any region. To serve his customers, he’s hired customer service agents to talk to customers using Salesforce’s Live Agent between the hours of 9AM to 5PM. Hamza’s website can be seen below, built using Visualforce and Bootstrap.
Hamza has hired customer service agents to serve customers between the hours of 9AM to 5PM on his time zone. The problem is that once his agents leave for the day, there’s no one available to talk to his customers should they require anything. Hamza can’t afford to extend their work hours further, but also can’t afford to outsource his customer service agents to another company. This is where the option of having chatbots available to talk to clients on a 24-hour basis is a very attractive value proposition for Hamza and many businessmen like him.
Outline of the Proof of Concept
With this in mind, Hamza sets off to start working on a chatbot to place on his website alongside the ability to chat to a customer service agent using Live Agent. The Proof of Concept’s solution is shown by the three buttons near the bottom of the above page as follows:
- 1. Speak to Live Agent (open 9AM-5PM)
This button launches a chat session with a real person using Salesforce’s Live Agent chat platform. The Live Agent button will also show the status of available agents, so if our Live Agent service is offline, then the button will be greyed out and will say that there are no agents available - 2. Speak to Chatbot (Open 24 hours)
This button launches a chatbot session using IBM’s Watson Conversation Service. This chatbot is hosted on IBM’s Bluemix, a platform which I have used in the past for other projects including this proof of concept. I recommend giving it a try, as I found it to be very user friendly and easy to understand. - 3. IBM’s Watson Car Demo
This button is not relevant for Hamza’s business, but it’s provided here to help the reader get acquainted with the Watson Conversation Service as this is the model we chose to build our solution from.
The architecture diagram below shows the building blocks of our proof of concept.
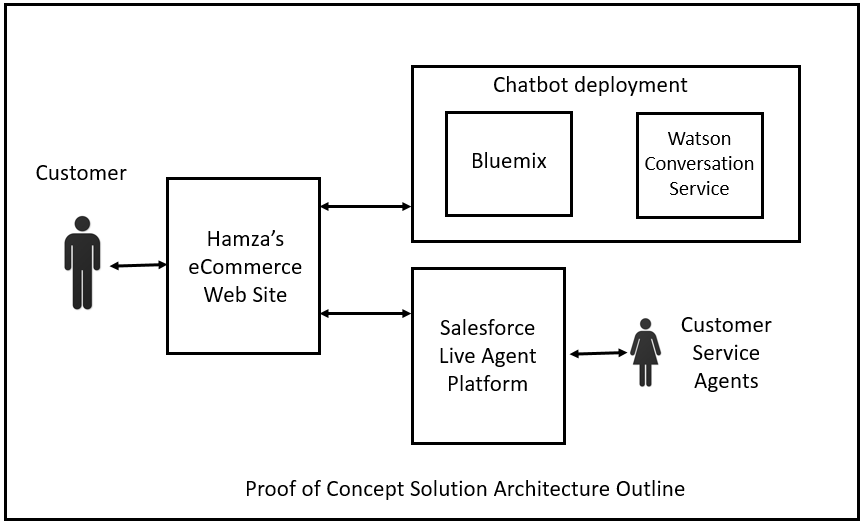
We’ll be focusing on deploying Live Agent to our Salesforce organization, changing the appearance of the chat button on our Visualforce page, then we’ll deploy a Watson conversation services chatbot on Bluemix so that we can reference the bot on our Visualforce page.
Let’s begin by setting up Live Agent and deploying it into Hamza’s website.
Live Agent: Initial Setup and Skills
The first thing we need to do is sign up for a Salesforce Developer account so that we aren’t constrained by the thirty-day free trial that Salesforce gives you by default. Follow the sign-up steps, verify your email, enter a new password, and sign into your newly created Salesforce organization.
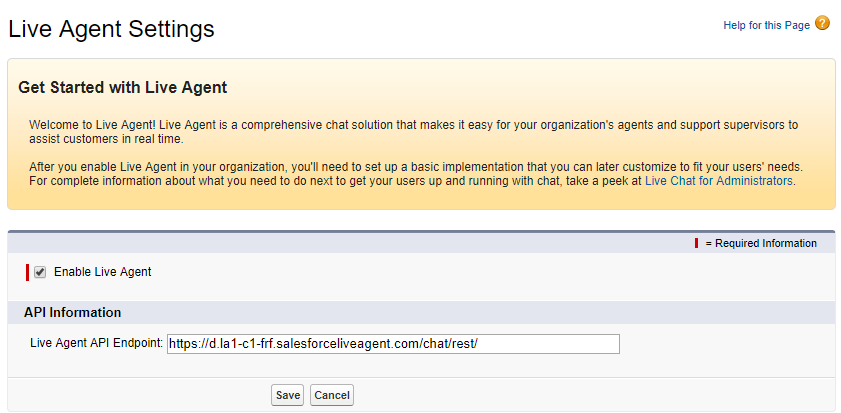
Enabling Live Agent is straightforward: Log in to your Salesforce developer account, click on Setup, then search for “Live Agent” under the Quick Find search bar to your left. Navigate to “Live Agent Settings,” then click on the check box with “Enable Live Agent.” The page will reload and you’ll be given a Live Agent API endpoint where your Live Agent setup will run from. The next thing we should do is assign skills to Live Agent. To do this, we’re going to search for Skills in the Quick Find Search bar, click on “Skills” under Live Agent Settings, and click the New button. For this simple proof of concept, the only person we’re going to assign all profiles to is the only user in this Salesforce organization and we’re going to save our changes.
The importance of skills in Live Agent is twofold: For one, it allows you to track the expertise of agents and technicians in your organization, granting them privileges to access tools and data on their end to better assist customers. The second reason we’ll be using skills in Live Agent is to properly set up our chat button, which provides visitors to our page a direct way to connect to a Live Agent session. Before we set up the chat button, we need to make a new site in our Salesforce organization to host our Live Agent deployment, two static resources for our offline and online states (which we will modify later), and create two new Visualforce pages.
Live Agent: Visualforce Pages, Chat Buttons, and Sites.
Let’s start by going into the Developer Console and creating two Visualforce pages by clicking on “File > New > Visualforce Page.” We’ll name both pages something that will respectively correspond to our custom chat window and sample page then declare the showheader attribute as false for both pages. Your custom chat window can be customized using Visualforce markup, allowing you to customize the appearance and functionality of your chat window according to the needs of your organization. The complete documentation for what you can do to your chat window can be found on this link. In the meantime, we can use the sample code provided to us in Salesforce’s documentation for Live Agent’s Visualforce Components. You can find the code for the chat window on my Github repository.
After that, we’re going to have to find two images for Live Agent to use as a button when agents are either online or offline and store them in our Salesforce organization as static resources. Static resources can be referenced through Visualforce markup or through the settings menu of Salesforce and can store images, stylesheets, and JavaScript files among a variety of file types. Let’s start by saving these two images below to your computer by right clicking on both images and selecting “Save Image As.”


To store these images as static resources, search for the Static Resource menu underneath the Setup menu, enter it and click the “New” button. Specify a name and (optionally) a description that best describes the static resource you are saving, click “Choose File” and navigate to where you saved these the images on your computer and click OK. After that, click on the drop-down list next to “Cache Control,” select “Public,” and click the save button. Repeat the process with the next image and you’ll have both your online and offline images stored as static resources in your Salesforce organization.
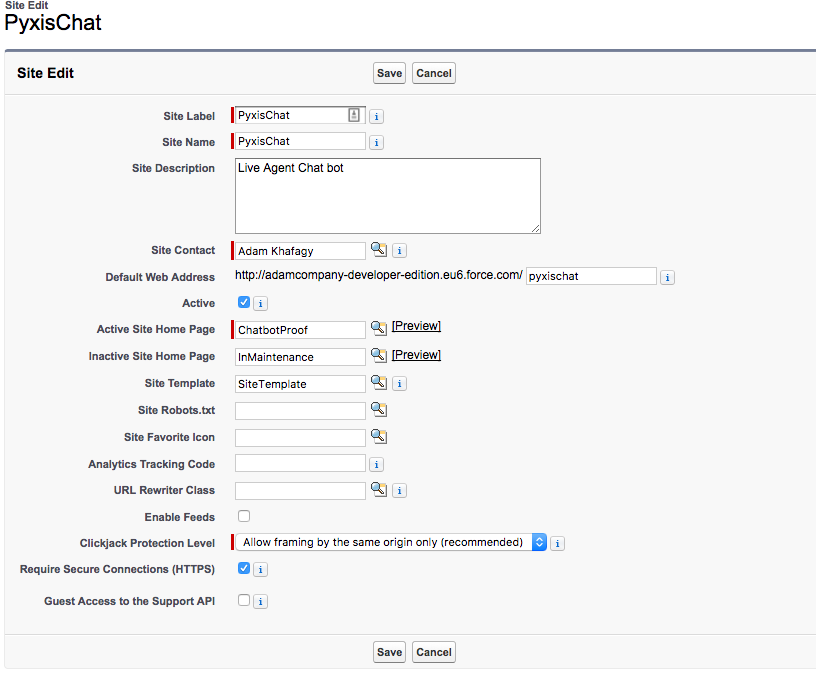
The last thing we’re going to do before we set up our chat button is to create a new site on our Salesforce organization. Go into Setup, then search for “Sites” or click Build > Develop > Sites and click on the “New” button. Give your website a name and description followed by what the web address will be. For consistency’s sake, give it a similar name to the one you specified earlier. Declare the website as active by clicking the checkbox next to “Active,” check “Require Secure Connections” to enable HTTPS protection, and declare the “Active Site Home Page” as the Visualforce page you intend to use for your sample page.
Before you click the save button, make sure your Site settings look something like the image below. Some information will be different according to how your organization is set up.
With all of our prep work done, we can now begin to generate our chat buttons. To do that, we’re going to search for “Chat Buttons” on the Quick Find search bar where we found the Live Agent settings earlier. Click on “Chat Buttons and Invitations” and specify the type as “Chat Button” from the drop-down list. Give your chat button a name and go through the settings according to what you need for your organization.
Select the skill you created earlier by choosing it from “Available Skills” and adding it to “Selected Skills,” then add the Visualforce page for our proof of concept website and custom chat page to their respective fields and specify your online and offline static resources in the online/offline image fields. Before you click save, make sure your Chat Button settings look something like the image below.
Take note of the chat button code that will be generated after you click the save button; we’ll get to editing this later, but this snippet of code will be incredibly crucial for the functionality of our page.

- <img id=”liveagent_button_online_<identifier>” style=”display: none; border: 0px none; cursor: pointer” onclick=”liveagent.startChat(‘<identifier>’)” src=”https://adamcompany-developer-edition.eu6.force.com/pyxischat/resource/1503592272000/online” />
- <img id=”liveagent_button_offline_<identifier>” style=”display: none; border: 0px none; ” src=”https://adamcompany-developer-edition.eu6.force.com/pyxischat/resource/1503592272000/offline” />
- <script type=”text/javascript”>
- if (!window._laq) { window._laq = []; }
window._laq.push(function(){liveagent.showWhenOnline(‘<identifier>’, document.getElementById(‘liveagent_button_online_<identifier>’));
liveagent.showWhenOffline(‘<identifier>’, document.getElementById(‘liveagent_button_offline_<identifier>’));
}); - </script>
We’ll get to the bolded parts later.
Live Agent: Deployment, configuration, and creating an app.
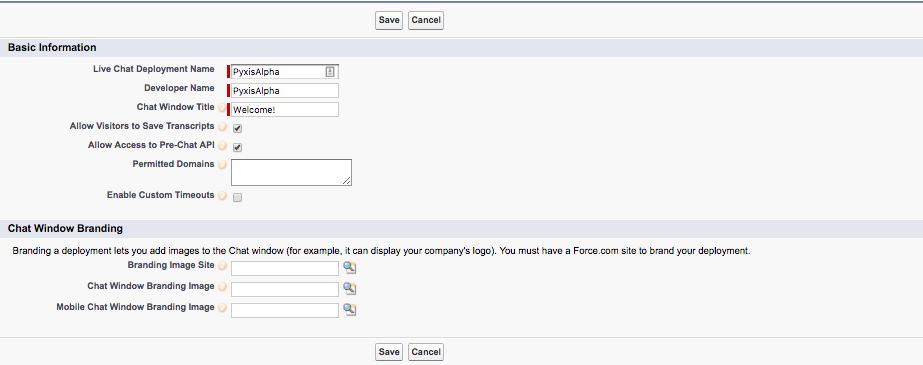
The next thing we’re going to do is create a Live Agent deployment to insert the Live Agent deployment.js file into our sample page, this will enable our Live Agent scripting as well as the “init” function to enable the button’s functionality to open up a chat button. Give your deployment and chat window a name and allow access to the pre-chat API and for visitors to save transcripts of conversations with agents. Make sure your settings look like the image below and click the save button.
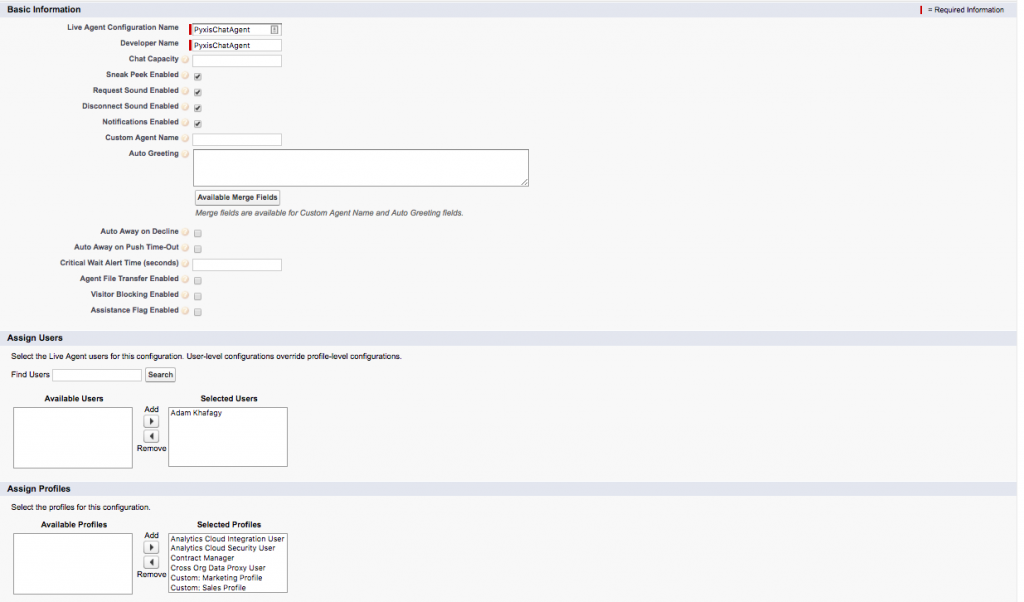
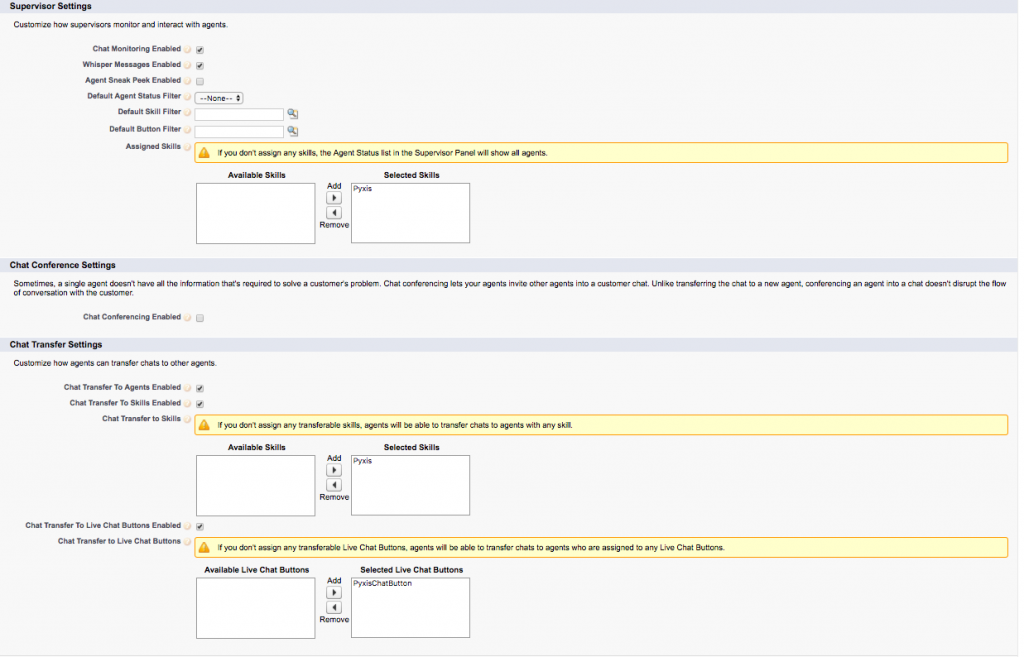
We’re also going to make a Live Agent configuration to determine what information is available to agents in Live Agent and can be customized to allow for notifications and audio cues. Assign users who are allowed to use this configuration and any profiles you wish to use. Assign the skills you made earlier for supervisor and chat transfer settings in the configuration settings, then select the button we made earlier for our Live Agent deployment and select it in our configuration for Chat Transfer settings. Once you’re done, make sure your settings look like similar to the images below and click the save button.
Finally, we’re going to create an app by going to “Build> Create>App” on our Salesforce organization’s settings to make a new app for our Live Agent deployment. Click on New, then select “Console” for our new app. Give your app a name and label, then select a new logo if you wish to customize it. Select “Cases” from the list of available navigation tabs, then let records from the Cases tab open as a primary tab. Check “Include Live Agent in this App” and select “New Case,” “New Lead,” “New Account,” “New Contact,” and then check “Include suggested articles.” Assign this app to all profiles by checking the box next to the word “Visible” and click save.
Live Agent: Changing the button’s appearance and testing.
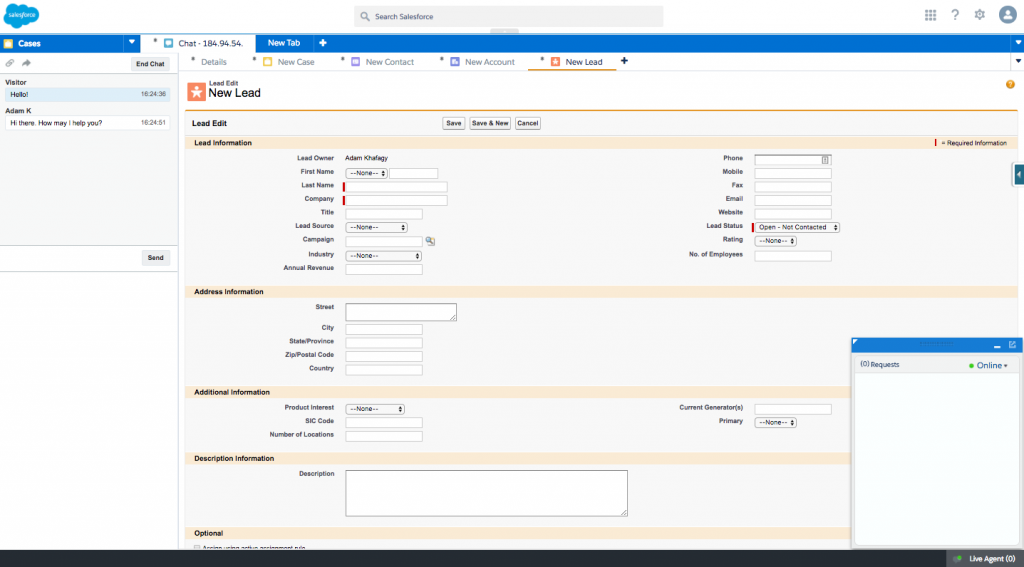
To put our Live Agent deployment to the test, let’s place all of the code snippets we copied from the Deployment and Chat Button settings inside of our sample page. Open your newly created app and change your status from “Offline” to “Online.” Save your progress and preview the sample page, take special care to observe how your button will change from its offline state to its online state when Live Agent goes online. Click the button on your page and if you hear an alert from the tab your Salesforce app is in, you’ve successfully established a connection! Click the “Accept” button and you’ll be in a conversation with a Live Agent session initiated from the sample page.
We’re not done with Live Agent yet; we’ll need to tweak our button code so that the user can click on an HTML button with custom properties instead of two different images. We’re also going to have the Live Agent chat window open up in a separate window with a custom size and disable the offline button when it appears in place of the online button. To do this, we’re going to specify a custom height and width using the following code:
- setChatWindowHeight(800);
- setChatWindowWidth(800);
From there, we’re going to make a separate JavaScript function that will disable the offline button. Doing this requires a function that will pass the ID of the offline button and disable it when the page loads. Once you write the function below, call the function in a body tag by writing “onload = disabledButton()” or whatever you named the function to disable the button.
- function disabledButton(){ document.getElementById(“liveagent_button_offline_<IDENTIFIERHERE>”).disabled = true; }
Finally, we’re going to edit the chat button code that was generated in Salesforce. We don’t want to get rid of everything, so I’ve bolded the parts that we want to keep and the unbolded parts are stuff we can get rid of. The idea is to keep the same functionality but instead of using images, we can use HTML buttons. We’ll start by making two input tags with the button type, then copy the IDs from the offline and online images and place them in our input tags. We’re going to put the onclick function from the online image inside the online HTML button then write a unique value for the online and offline buttons. Save your changes and make sure your code for the button looks something like this:
- <input type =”button” value=”Speak to Live Agent (Open 9AM-5PM)” id=”liveagent_button_online_<identifier>” onclick=”liveagent.startChat(‘<identifier>’)” />
- <input type =”button” value=”No Agents Are Available. ” id=”liveagent_button_offline_<identifier>”/>
- <END CODE>
Make sure you test your code before proceeding to make sure that the functionality of the offline button being hidden when Live Agent is online and vice versa will work. This concludes the Live Agent part of our project, the next part of this blog will focus on deploying a Watson Chatbot on Bluemix and referencing it in our Visualforce page.
I’ll see you in the next part!
~Adam out.