
Originally published on September 22nd, 2017.
Now that we’ve gotten Live Agent up and running in our Salesforce organization, it’s time to start working on our chatbot! We’re going to be working off of a sample chatbot that is written using the Node.JS SDK of Watson Conversation services.
IBM Watson: Setup, Chat Window Appearance, and Preparation
Before we start, it’s recommended that you do the following:
- Sign up for an IBM ID so that we can use Watson Conversation services to build our chatbot and deploy it on Bluemix.
- Enter your email, password, username, and your payment information and log in to Bluemix.net. You won’t be charged for merely entering your payment information.
- Install NodeJS and the Cloud Foundry command-line tool.
- Clone or download a zip archive of the Node.JS Watson conversation services demo from IBM Watson’s Github repository.
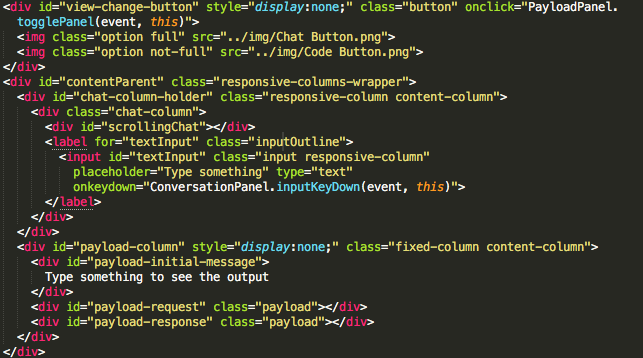
We’ll begin by simplifying the chat window provided to us by navigating to “conversation-simple-master/public/index.html” in your local files. Open the index.html file in the text editor of your choice and write style=”display:none;” in the opening div tags to “view-change-button” and “payload-column.”
Save your changes and close the document. Make sure you have Node.JS and the Cloud Foundry command-line client installed and updated to their most current versions, then change the working directory on your command-line to the folder where you unzipped the Github repo to. To make it a bit easier to see what files you’ve changed, added, or edited, be sure to reveal all hidden files and folders on your system. Windows 10 users can enable that setting by clicking the View tab on File Explorer, then clicking the “Hidden Items” checkbox in the “Show/Hide” section. macOS users should use the terminal command below, then hold the options key, right click the Finder icon on the dock and click “Relaunch.”
- “defaults write com.apple.finder AppleShowAllFiles YES”
IBM Watson: Creating a Conversation Service
Deploying your bot to Bluemix starts with changing the working directory of your command-line tool the folder where you unzipped your repository. From there, you’re going to have to connect the Cloud Foundry command line tool to your Bluemix account by using the “cf login” command. Enter your API endpoint (Usually in the form of https://api.de.bluemix.net with “de” corresponding to your region, Germany in this case), then enter your IBM ID associated with your Bluemix account. Once you successfully log in to Bluemix through Cloud Foundry’s command-line tool, you need to create a conversation service instance within Bluemix that will host our chatbot. This can be done with a simple terminal command:
- cf create-service conversation free my-conversation-service
The underlined part can be renamed to anything you’d like, as this will provide the name of the conversation instance for the bot. What this command does is tell Bluemix to create a new conversation service instance under the free plan that will host our Watson chatbot. You can select different service tiers from Bluemix itself, though they will cost more money depending on how many API requests are going to be made to your conversation instance.
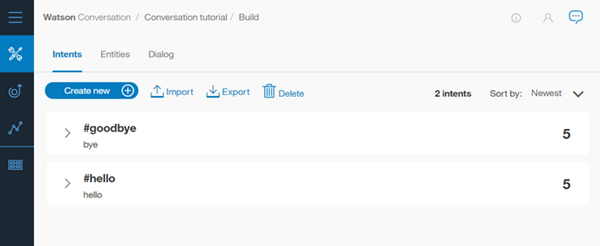
The next thing we need to do is go to https://console.bluemix.net/dashboard/services and navigate to our newly created conversation service instance under the Services tab. Click on it, then click the “Launch Tool” button. If prompted, enter your IBM ID as you would if you were signing into Bluemix. Once you’re in the Watson Conversation services page, click the import button next to the “Create” button and navigate to <project root>/training/car_workspace.json, then select “Everything” and click the “Import” button to import the workspace that your bot will use to acquire data for all user input and bot output phrases.
IBM’s Watson: Creating a Service Key
The next step is where the hidden files will come in handy as we’ll need to configure our app environment so that we can push the files from the Github repository into Bluemix along with any changes that are being made. To do so, we’re going to have to create a new service key by using the following command:
- cf create-service-key my-conversation-service myKey
The underlined portion – like the conversation service command before it- can be renamed to whatever you want while the italicized part references the conversation service instance you created earlier. Once you create the service key, you can retrieve the details of the service key by using the following command:
- cf service-key my-conversation-service myKey
Take note of the output on your command line console, as the JSON output the command will generate will be incredibly important for the next few steps. You’re going to have to use the output from the service-key command to fill the values in for a .env.example file that Watson (and by extension, Bluemix) will use to initialize the app environment. Open the .env.example file in your text editor, copy the values next to “username” and “password, then paste the values next to the “CONVERSATION_USERNAME” and “CONVERSATION_PASSWORD” variables respectively. The format of the service key credentials you will be generating will look something like the sample credentials below.
- { “url”: “https://gateway.watsonplatform.net/conversation/api”,
“username”: “ca2905e6-7b5d-4408-9192-e4d54d83e604”,
“password”: “87iT7aqpvU7l” }
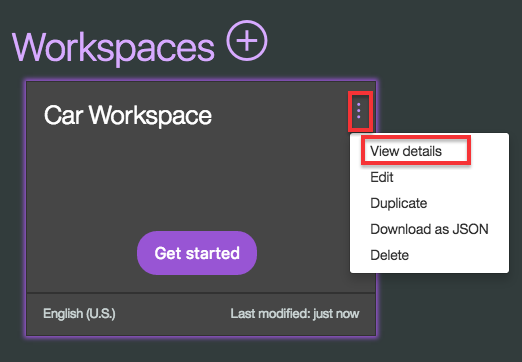
The value for the final variable can be found in the workspace you imported into Watson by clicking the menu icon on the upper-right hand corner of the workspace’s tile and selecting “View Details.” Copy the workspace ID into your clipboard and paste it into your .env.example file next to the WORKSPACE_ID variable.
For each of the three values, do not include the quotes around them and paste just the values alone. Save the file as “.env” and you will be ready to move onto the next step.
- WORKSPACE_ID=48be4bga-p935-7gf3-g652-2255371vra841
CONVERSATION_USERNAME=ca3105e6-7b5d-4408-9192-e4d54d83e604
CONVERSATION_PASSWORD=87iT7w1pvU7l
IBM’s Watson: Deploying to Bluemix
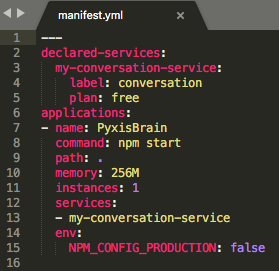
We’re going to need to change a few lines in the manifest.yml file of our project root directory before we push the app to Bluemix so that we can give a unique name to the application that our Chatbot will be deployed to and so that we can declare the name of the conversation service instance we have created. We want to change the name value under “applications” and the name value under “services” in the manifest file so that Bluemix can create a new app to host our chatbot of a user-specified name and use the conversation service we initialized earlier.
To push our app, we’re going to use one very simple command:
- cf push
Give it some time to push all the files in our working directory to Bluemix and eventually your command line output will display a Bluemix URL where your chatbot files are hosted. Use this URL to access your app and interact with your chatbot.
IBM’s Watson: Testing and referencing in Visualforce.
Once you’ve deployed the bot to Bluemix, we need to make sure that the bot works. Visit the URL that you are using to host the chatbot you deployed and start feeding input to it. To do that, click on the textbox and enter some text like “Hello,” “Good bye,” and “turn the AC on,” then click enter. If your bot is responding to your input, then it’s working! Let’s go back to our sample Visualforce page in the developer console and add some functionality to open up our bot on Bluemix from our sample page. We’ll need to create a JavaScript function that will open the chatbot from its Bluemix link in a new window of a specific size with no toolbar, and scrollbars enabled. To call the function, we’ll put a button with an onclick property that will call our Watson Chatbot window. Add some extra information like a unique id and value that best corresponds to the button, then save your changes and preview the page. If a new window opens according to how you specified it in your script, then you’ve successfully implemented the demo chatbot in your sample page! The script should look something like this:
- function watsonWindow(){
window.open(“<Bluemix URL here>”, “_blank”, “toolbar=no,scrollbars=yes,resizable=yes,top=500,left=500,width=400,height=400”); } - <input type = “button” value=”Speak to Chatbot (Open 24 hours)” id=”watson_button” onclick=”watsonWindow()” />
But what if you wanted to add some extra functionality and get your bot to respond to more words and phrases?
IBM’s Watson: Customization
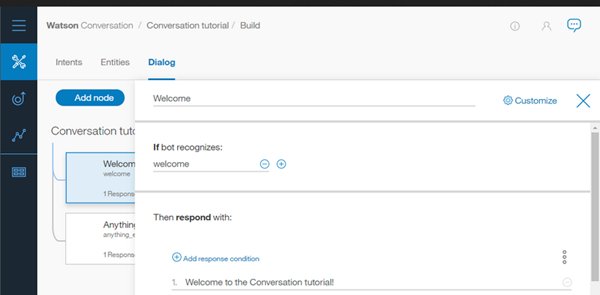
This part will require a little bit more explanation and research, but is straightforward in its concept and applies to other chatbot platforms. Watson, like API.AI, Chatfuel, Recast, and Wit.AI are all reliant on “neurolinguistic programming” (or NLP) which uses phrase recognition, word detection, and conversation mapping to train how the bot responds to user input. These combinations of words and phrases across several languages and ways of speaking are narrowed into intents and entities, which Watson uses to determine how to best respond to the user. From there, you have to train Watson to recognize certain kinds of words and phrases across various spellings and languages to ensure that your bot can understand what the user is writing.
Intents are defined as the purpose of a user’s input, such as a question about what items are available and what credit cards are accepted while entities are terms or objects that are relevant to an intent. For instance, “PayPal” could be recognized as an entity that lines up with the credit card intent. For your bot to recognize multiple entities, you need to list synonyms and other forms of spelling certain words that the user might enter. To chain all of these together, you need to build a dialog that will recognize defined intents and entities and connect them using a dialog builder. Watson and several chatbot platforms like it will provide these services in your workspace, which will contain all the tools, responses, inputs, intents, entities, and dialog that your bot needs to function correctly.
Watson’s training and conversation mapping tool is incredibly adept at handling this, since it can retrieve input data from other users in real time. This means that training a bot is as simple as navigating to the “training” tab under your workspace and reconfiguring what input corresponds to what intent or entity. This makes your chatbot much more flexible when it comes to adding new or editing existing dialog nodes or intents to your chatbot. The documentation in IBM Bluemix discusses it in greater detail with examples as to how to chain together dialog nodes and train your bot more effectively.
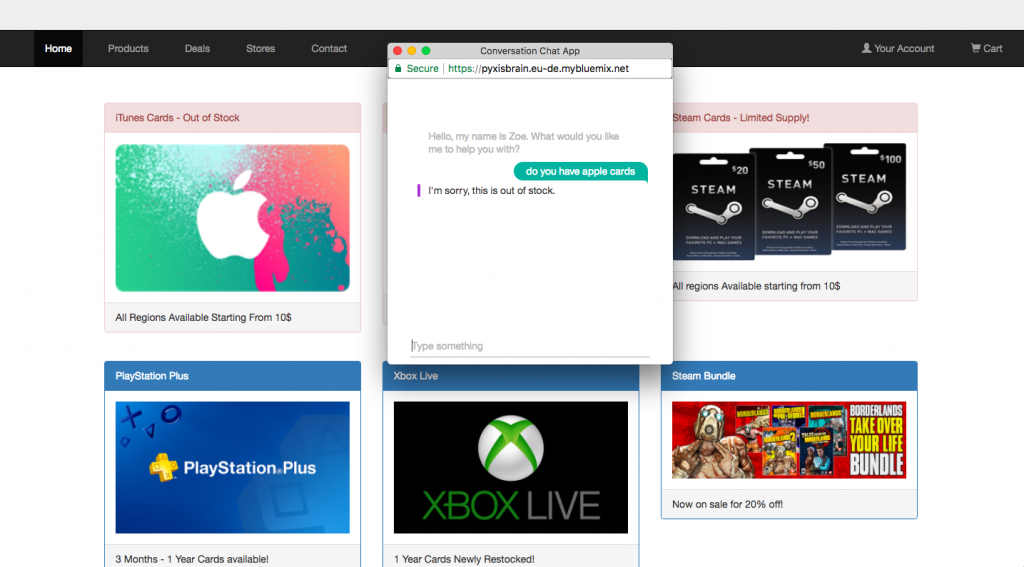
The workspace and bot you deployed from the Watson repo offers a very solid foundation that you can use to edit the chatbot’s functionality and responses. Here’s an example of what that looks like on our sample page after using the Watson services to change how the bot responds to user input according to our use-case scenario.
Conclusion + Other notes
If you followed this tutorial from start to finish, then you’ll have created a functioning chatbot within Watson Conversation services, pushed it to Bluemix, then made a custom Live Agent deployment and chat window on your Salesforce organization. We also made a proof of concept website for a use-case scenario involving someone who wants to use a chatbot to handle customer service questions and we’ve added some extra functionality to our bot by training it through Watson’s incredibly powerful bot training toolset.
This project is more about research than it is about development, necessitating a clear understanding of how neurolinguistic chatbots work. Watson and Bluemix are both excellent places to start with each service providing clear documentation, robust services, and an inexpensive barrier to entry that will allow you to better understand NLP-powered chatbots more easily. Hopefully, you will walk away with a clearer understanding of how to create, deploy, and edit chatbots of your own making.
The files for this project can be found on my Github repo, feel free to fork it and make any changes to improve upon this project.
Until next time,
~Adam out.