Originally published on June 22nd, 2016.
Twilio’s capabilities as a voice calling and messaging platform-as-a service are a perfect fit for Salesforce’s raw power as a CRM and cloud computing solution for businesses. While Twilio Voice and Messaging officially support the Force.com platform through custom libraries, the beta SDK for Twilio Video doesn’t officially support Force.com yet.
That is, unless you decide to do it yourself.
Today, I’m going to show you how to build your own Twilio Video client on a Visualforce page using only the JavaScript SDK of Twilio Video. You will need to use a WebRTC compliant browser, so be sure to use Firefox or Chrome while following along with this guide.
Sign Up and Setup.
The first step to starting your Twilio Video application on Force.com is to sign up for a developer account on Salesforce.com. Doing so will allow you to access a free copy of the entire Force.com platform without having to pay after a thirty-day trial. You should also sign up for a Twilio account to access the APIs you will need to build the application from scratch. Keep in mind that you will need to deposit money into your account to upgrade your free Twilio account to a paid account in order to use the Video SDK since Twilio Video doesn’t support the test credentials provided to you.
Once you’ve set up both accounts, open up the developer console on your Force.com developer account by clicking your name on the top right-hand corner and clicking “Developer Console”. Create a new page by clicking File > New > Visualforce Page and give it a name. To start, we need to change the value of the opening tag of the apex:page tag so that we can work on the page freely as though it were a blank website. By entering showHeader=”false”, we’re disabling the default tab layout and allowing the Video SDK to work without any interference from Salesforce’s layout. Don’t forget to put a title of your choosing in between <title> tags.
After changing the showHeader attribute, we’re going to have to define our scripts and stylesheets remotely to enable the functionality and appearance we need out of our Twilio client. We’re going to start by linking to JQuery and the Twilio SDKs by using apex:includeScript, similar to how we use <link> tags in HTML. We can also link to remote CSS files so we can use custom styling for our page. For the purpose of demonstration, we’ll be using custom CSS provided by Twilio in a quick-start app used to test the functionality of the voice calling functionality. The sources we need are as follows:
- <apex:includeScript value=”https://ajax.googleapis.com/ajax/libs/jquery/1.7.2/jquery.min.js”/>
<apex:stylesheet value=”https://static0.twilio.com/packages/quickstart/client.css”/> - <apex:includeScript value=”https://media.twiliocdn.com/sdk/js/client/v1.3/twilio.min.js”/>
<apex:includeScript value=”https://media.twiliocdn.com/sdk/js/common/v0.1/twilio-common.min.js”/> - <apex:includeScript value=”https://media.twiliocdn.com/sdk/js/conversations/v0.13/twilio-conversations.min.js”/>
Video Preview and WebRTC
To put our newly added sources to the test, we’re going to start by defining our video preview and log text in the page. Start by adding a <video> element of your desired width and height and the id of “local-media” Remember to define the size of the video element according to percentages and not pixels so as to accommodate different screen sizes. On top of the <video> element, we’re going to put an <h1> tag with “Preview” between the opening and closing tags for clarity’s sake. We’re also going to want to provide a log that prints text to the user when certain events happen while using the client. Adding a div tag and an id of “log” will accomplish this, along with a default value of “Connecting…”.
Now it’s time to add some functionality to our page: First, we need to create a validation event that checks the browser the user is accessing for WebRTC compliance. If it doesn’t, then the user cannot properly use the video client and needs to be notified as such. We also need to fetch the user’s webcam footage and display it on the screen as a preview of their webcam to our local-media div we made earlier.
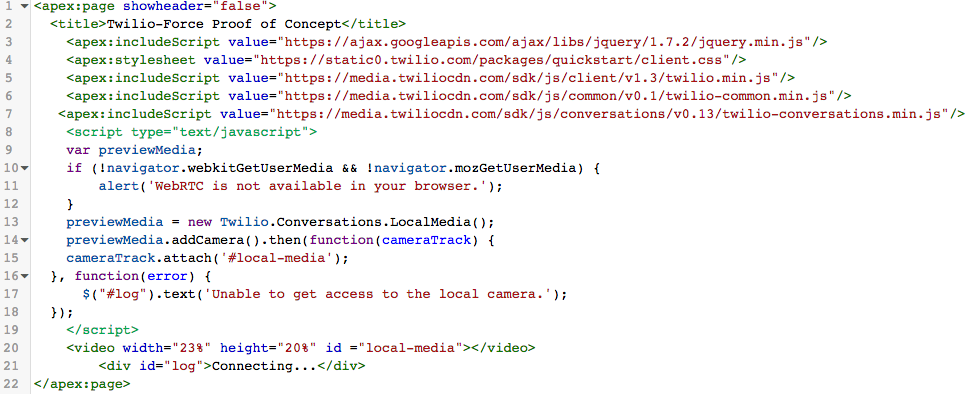
Start by opening a script tag, define the type attribute as “text/javascript” and define a new variable of “previewMedia” underneath the opening script tag. Add the WebRTC script and directly underneath that, add a camera track to the local-media div, and handle an error condition should anything go wrong in retrieving access to the camera. The script below should look like this so far:
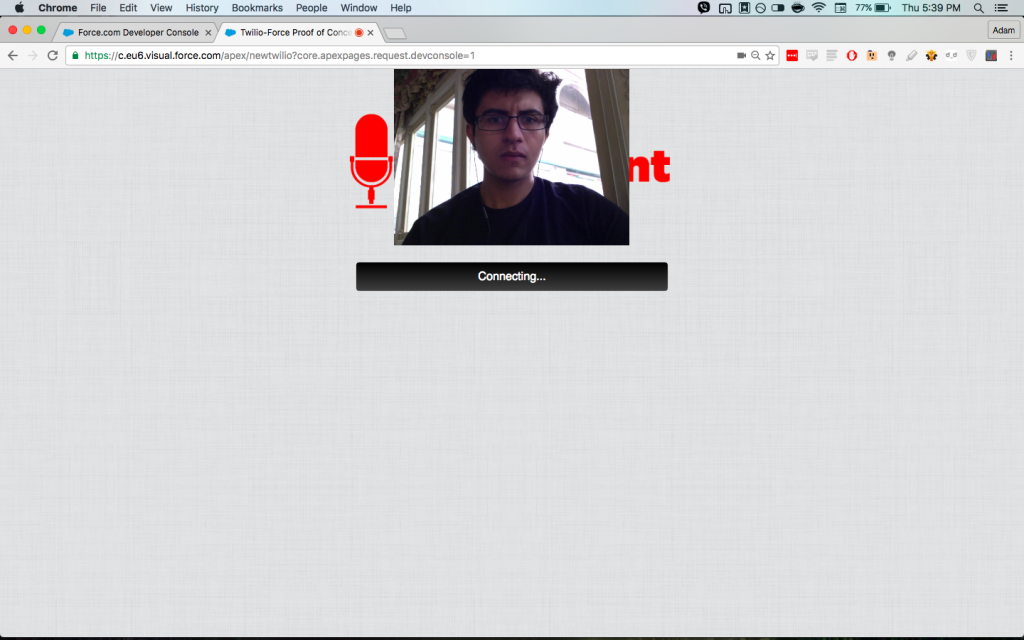
Once you’re done, hit the preview button on the Force.com Developer Console to see what you’ve managed to build so far. If the result on your screen looks like the image below, you’re on the right track. It may look a little messy right now, but there’s more to cover. Always remember to save changes you make to your page before continuing in the event that anything goes wrong. It’s also recommended to keep a backup of the last operational state your application or page was in before adding new functionality or in trying to fix a bug.
User Interface
It’s time to focus on what the page will look like once the user opens it up on his browser. We want to make sure that buttons and elements are clearly labeled while providing the user with enough information to know what’s going on with the page. Between the video tag and the log div we made earlier, we’re going to put a div tag that houses these two elements with a height and width of 100% and name the class attribute of the tag “bg”. We’re also going to make another div tag right underneath the bg div where we’ll put our buttons and give it id of “buttons” for organization’s sake.
Inside the buttons div, we’re going to put two buttons that will represent our Send Invite and Hangup buttons. We’ll give them a class of “call” and “hangup” and respectively define their ids as “button-invite” and “hangup”. We should also add an <h1> element just above our webcam preview’s <video> tag with “Preview” between the opening and closing tags. We also need to figure out how we’re going to specify who we’re going to invite, so we need to create a textbox underneath the buttons we made so that the user has a place to enter the identity of who they want to video call. The following lines should do the trick:
- <input id=”invite-to” type=”text” placeholder=”Identity to send an invite to”/>
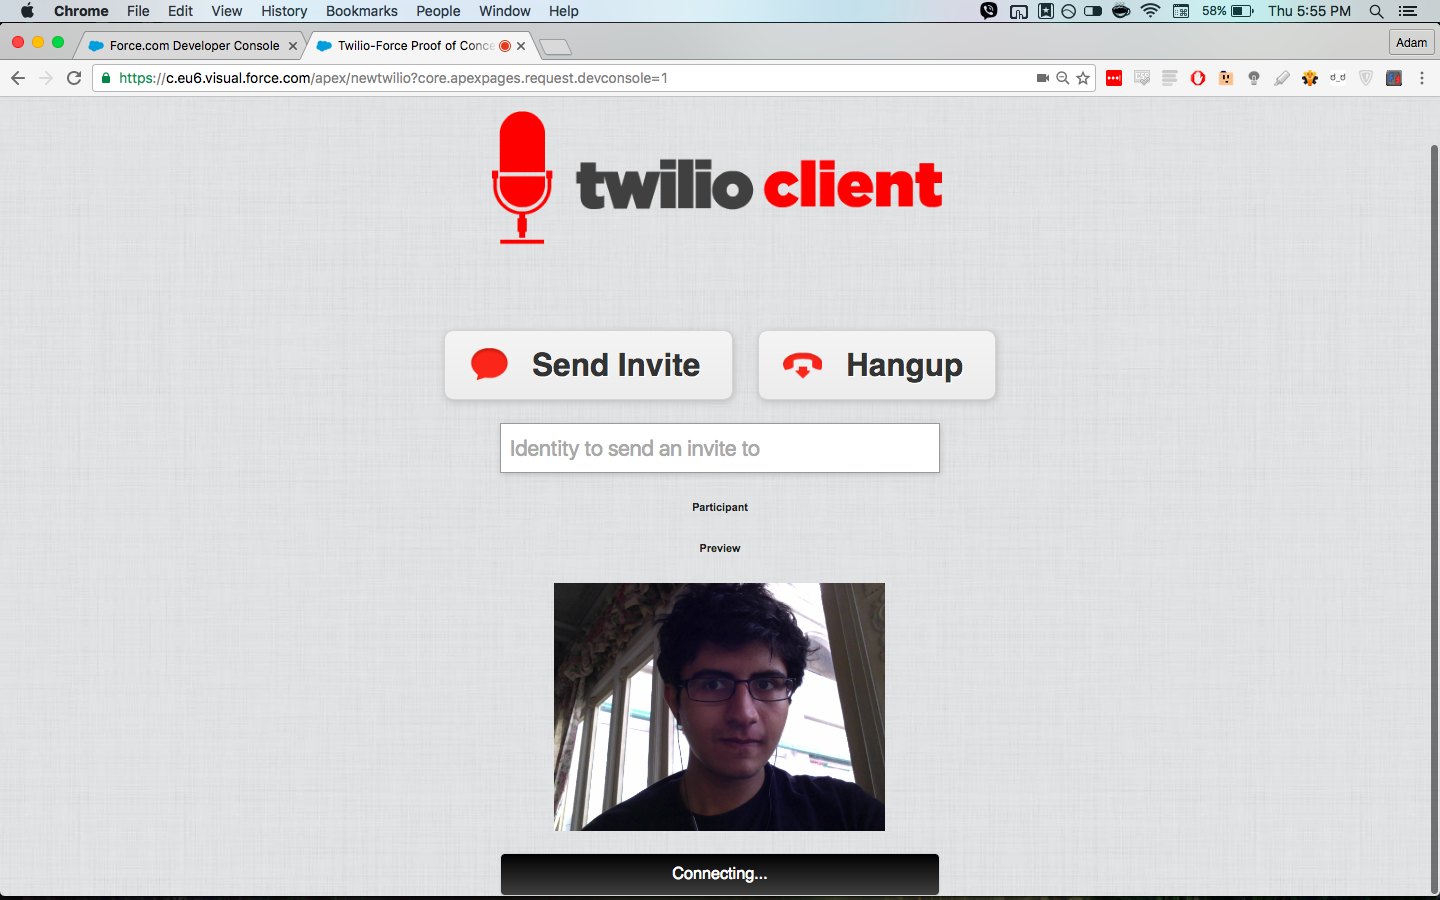
Before we preview our work, we need to specify where the participant’s video will be displayed on the web app. Below the closing tag of our “invite-controls” div, open another <h1> tag and write “Participant” between the opening and closing tag. Then open a div tag directly underneath and give it an id of “remote-media”. If we preview our work, we can see that we’re pretty close to completing the User Interface, but some elements look really crammed together.
Let’s fix that by adding “style=padding-top:2%;” to the opening tag of the “invite-controls” and “remote-media” div tags, then open a new div with the same style property and place our preview video element between the opening and closing tags. Preview your work again to see how your positioning looks. If your page and code look like the images below, then we’re ready to move onto a very crucial element of this project.


Token and Identity
For the functionality of calling other users to work, we need to be able to tell our page where to find the name and token needed to identify and verify its connection to Twilio’s servers. We can hard-code an access token taken from Twilio’s video testing tools, but the token will expire and we’ll have to generate a new one from that site. To keep ourselves from relying upon this, we have to create something that will generate a new token every hour to maintain our connection to Twilio’s servers for longer than an hour.
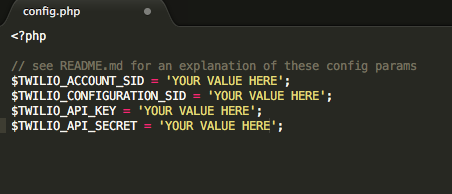
A good starting point for this will be Twilio’s PHP video quick-start application on their Github page. Download it here and unzip the file into a new folder on your computer (Any name will do). Follow the instructions on the page and use the README.md file to learn where to find the parameters you need to set up the quick-start’s config.php file. With these values in place, all what’s left is to get the PHP SDK for Twilio Video here.
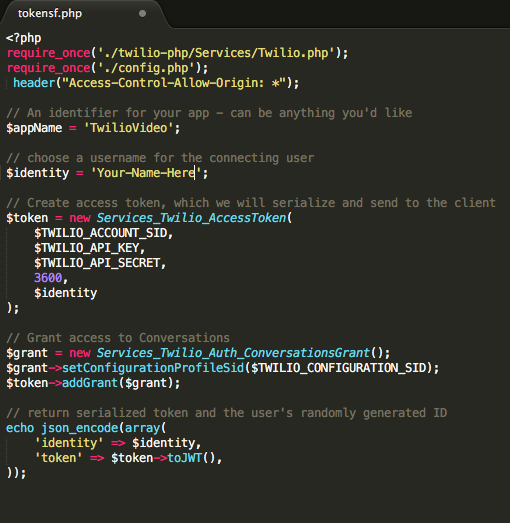
Create a new folder in your quick-start folder and unzip the PHP SDK inside your newly created folder. Rename this new folder “twilio-php” and open the token.php file. To clean up the file, remove the two lines beginning with “use” and delete the “include(‘./vendor/autoload.php’);” and “include(‘./randos.php’);” line at the top so we can directly reference the SDK in our folder and define an identity for our Visualforce page ourselves.
We’re going to add “require_once(‘./twilio-php/Services/Twilio.php’);” to fetch the PHP SDK directly from our folder and “header(“Access-Control-Allow-Origin: *”);” after requiring config.php to prevent a CORS (Cross Origin Resource Sharing) error from occurring upon loading the page in Salesforce. Remove randomUsername(); from the $identity property and give it a name of your choice in this format: $identity=’your-name-here’;. Save your changes and rename the file “tokensf.php”. We’ll get to why we’re doing this later, but let’s focus on exposing these files to the internet.
Connecting to Twilio
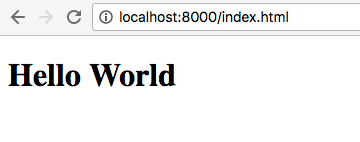
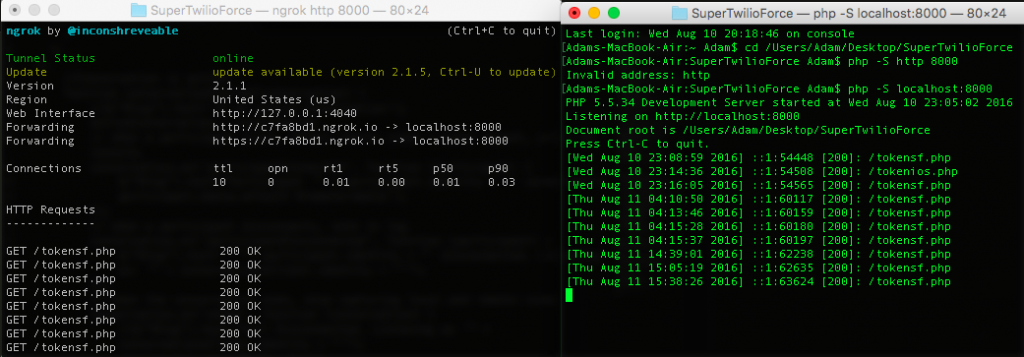
For Twilio to grant access to users accessing their servers through a mobile or web-based client, Twilio needs a secure HTTPS-based connection to continue using their services. In this case, we’re going to start by hosting a localhost in the directory that we’re keeping our PHP quickstart and SDK files in and exposing this localhost to the internet by way of opening an NGrok server on our computer. Simply open up Terminal or Command Prompt and navigate to your twilio-sf folder. Type “php -S localhost:8000” and hit Enter. We can test if our localhost is working by typing in “localhost:8000” and opening a simple index.html file or even the tokensf.php file.
If it works, we can move onto the next step. Open another Terminal or Command Prompt Window (or tab), navigate to the same directory you hosted your localhost from, and type “ngrok http 8000” to expose your localhost on port 8000 to the local internet. Do NOT turn off or reboot your computer, as doing so will mean repeating the above process again with a different NGrok domain assigned to your localhost.
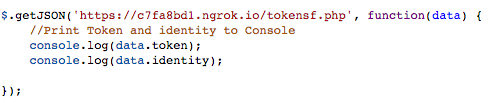
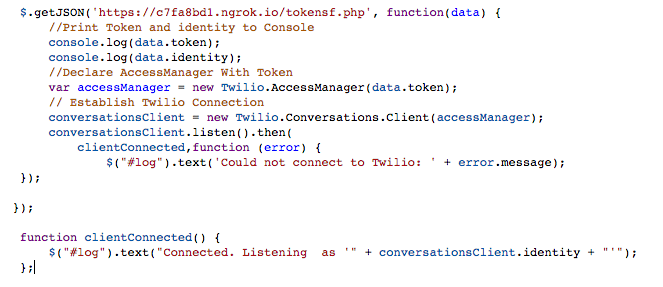
To retrieve our token and identity in our Visualforce page, we need to add a function that will retrieve the token and identity and print them to the console. First, we’ll create a new variable named identity where we declared the previewMedia variable and then write a $.getJSON method that will use our NGrok server to retrieve the tokensf.php file we made, and then execute a function that will print the token and identity to the console.
If we press the preview button and open your browser’s JavaScript console in your Visualforce page, we’ll see an incredibly long series of characters followed by the name you put in the identity parameter of the tokensf.php file. If you get an Access-Control-Origin-Allowed error, you may need to add an exception to the CORS menu in your Salesforce settings for your NGrok and Salesforce domains. Refer to the console to see what you need to fix.

Before we continue adding to your $.getJSON method, we’re going to declare two more variables where we declared identity and previewMedia. We’ll give them the names of conversationClient and activeConversation then go back to our $.getJSON method. We’ll declare another variable called accessManager and declare a new Twilio.AccessManager with data.token in its parameters.
We’re also going to make a function directly underneath the $.getJSON method that will fire upon successfully connecting to Twilio’s servers. In our $.getJSON method, we’re going to create a new conversationsClient that will listen for a connection and return an error message if we cannot connect to Twilio’s servers. Your code should look something like this:
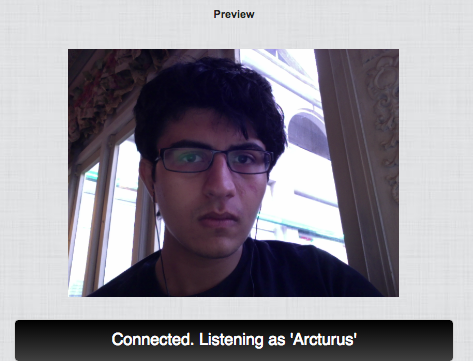
Preview your work and look at the log; if it changes to read “Connected. Listening as ‘identity-here’”, then we’re almost done with our Visualforce page.
Creating and Ending a Call
To allow the user to send/receive and end a call, we need to add more functionality to our buttons, invite-to text field, and the remote-media div tag. As of now, these elements do absolutely nothing and are merely decoration. How do we get them to assist in the process of answering and ending calls? We can start by adding a function to our clientConnected function that fires upon receiving an invite from another user. We also need to bind the invite-button to our invite-to text field and handle the functionality of sending an invite while making sure we create an error condition in case no one responds or if we misspelled the receiver’s identity, and that the text field is cleared upon clicking the invite-button. Your clientConnected function should look like this:
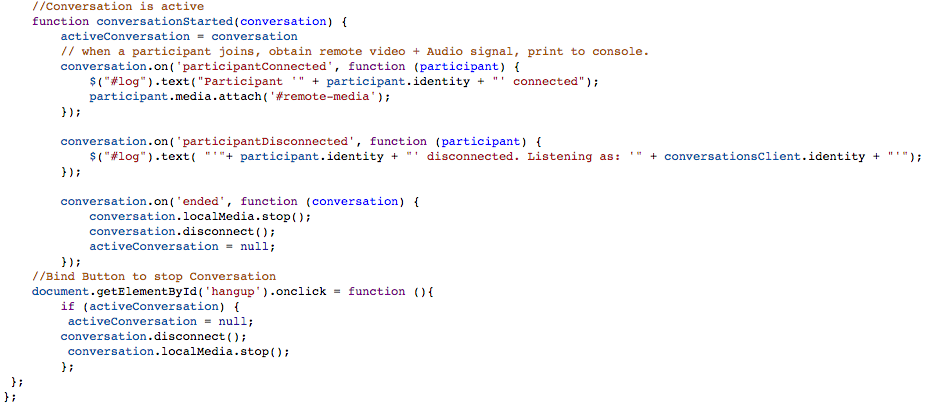
Unfortunately, it seems that we have yet to define the conversationStarted function that will handle what will happen when a call is in session, when it’s disconnected, and when the user presses the hang up button. This means telling the text log in our page what to print, what the SDK should do in the event of a connection or disconnection, and how it will handle the event of an activeConversation according to what context. We’ll end up with something like this:
Testing
There are three ways to test the functionality our page out. The first and simplest way involves using Twilio’s video testing tools and creating a conversation with the identity assigned to our Visualforce page. We can test the hangup button and the act of receiving a video and audio signal from the participant, but we can’t send an invite back. The second way to test our app is to go into our tokensf.php file and change it so that it requires the randos.php file. We’d also have to change the $identity property to randomUsername(); as well.
- require_once(‘./randos.php’);
- $identity = randomUsername();
This would have the effect of granting a random identity to anyone who opens the Visualforce page, allowing you to send and receive invites from other identities using the client. The third way to test your Visualforce page is to use Twilio video’s mobile SDKs. Simply follow the instructions in Twilio’s documentation (iOS and Android) and deploy the app onto a simulator or device. Enter the identity assigned to your Visualforce page, send an invite, and wait to see what happens.
Conclusion
If a connection is established and you’re able to hear and see the participant, you’ve successfully added video calling functionality to your Visualforce page! If you want to download the source code for the Twilio Video page, visit my Github repository here. All the files needed for NGrok and Force.com are there. Feel free to fork, pull, and push any changes you wish to make that will improve upon the functionality of this Visualforce page.
-Adam out.